Use Your Keyboard and Mouse on More than One Computer with Synergy Recently, Thomas reviewed a program called InputDirector, which lets you use a single keyboard and mouse across multiple computers. For some time, I've been using Synergy, which does the same thing. In this review, I show you the features of Syngery and show you how to use it.
Synergy FeaturesSynergy's function is, in essence, very simple: it allows you to control multiple PCs with the use of one keyboard and mouse. You need to install Synergy on each computer and then set one up as the "server" and the other PCs and the "clients".Synergy also lets you share the clipboard and screensaver between your computers. Synergy doesn't take much setup and once complete, is a breeze to use–I highly recommend it. How to Use SynergyTo use Synergy:1. Install Synergy on every computer you want under control of your "server" and also on your server. 2. Start Synergy on the client computers, select Use another computer's shared keyboard and mouse (client), type the name of your server*, and click Start. * To get your server name, use your server's Computer name. To get this, click the Start button, right click Computer, and click Properties. The name is listed next to Computer name.  3. Open Synergy on your "server" (the computer that you'll use to control the other computers connected.) Select Share this computer's keyboard and mouse (server), and click Configure…  4. Under screens, click the plus sign and add each client, by Computer name*, to the list. * To get your computer's name, use your client's Computer name. To get this, click the Start button, right click Computer, and click Properties. The name is listed next to Computer name. 5. Now you'll need to tell Synergy where each screen is. In the example below, I have three computers next to each other:GVD – SVUL – DXPL I set the following rules (see screenshot), which states GVD is left of SVUL, SVUL is left of DXPL, DXPL is right of SVUL, and SVUL is right of GVD. I recommend leaving the percentages as is (unless you have a need to change them i.e. two screens, one on top of the other, to the left of one screen.)  6. Press OK and click Start.  You may get a pop up from your Firewall and you'll need to allow the connection. If you are using third party software, you may need to add a manual rule to allow Synergy to communicate between your computers. Please note: It can take up to one minute to establish a connection between your computers so please be patient. Other Settings for SynergyI use Synergy to control my Home Theater PC (HTPC) when I'm using my laptop. One thing I noticed, after installing Synergy, was that the screen didn't power off after the HTPC was idle (a useful feature as I often walk away from my TV and leave it wasting electricity.) To fix this issue, I changed the setting on the server to not Synchronize screen savers. (As my laptop has a different screen power setting.) You can also autostart Synergy when you start your PC (useful if you're making this a permanent setup.)  At any time, you can see which computers are connected together by right clicking the Synergy icon in the system tray and clicking Show status.  I really like Synergy; it uses minimal system resources and just works. The only problem I've found is if you Remote Desktop into from a Synergy connected PC to another Synergy connected PC and move the mouse out of the screen (confused yet), the clipboard stops working; however, this is not really a problem — more of a quirk. Download Synergy
|
Friday, February 18, 2011
Use Your Keyboard and Mouse on More than One Computer with Synergy

Friday, January 28, 2011
Enable Readyboost in Windows 7
ReadyBoost is One of the awesome features available in Windows 7 and Windows Vista. ReadyBoost can able to improve your system performance in a great way. There is no required to purchase or fix any extra internal RAM in your PC or Laptop.

ReadyBoost uses external storage like a flash drive or external hard drive or Memory Card as external RAM to get faster Windows start-up and it's programs or application use. Main Job of ReadBoost by caching most recently accessed or opened applications or programs or files on any external flash memory device or external hard drive.
It's very easy to enable the ReadyBoost feature in Windows 7 as well as Windows Vista also. Here is a simple tutorial guide for you to enable the ReadyBoost feature in Windows 7 and Windows Vista.
- Plug-in your USB storage device to your Computer
- Go to My Computer, right-click on the removable storage device and choose Properties
- Then click on the ReadyBoost tab
- Next click on Dedicate this device to ReadyBoost option
- Click on Apply and then OK. Windows 7 now configures the drive to use it as an extended cache
Wednesday, January 12, 2011
Ways to Transfer Emails from One Gmail account to Another

If you have two Gmail accounts then you would not want to open each one to check mails in different browsers, so let's check out the three different ways with which you can transfer mails between the two Gmail accounts easily and effortlessly.
1. Setup a Filter for Forwarding all mails
- Setting up a filter for forwarding your mails is the simplest of all, for setting up the filter, all you will need to do is set up the filter which basically forwards all the incoming mails in your old Gmail account to the new Gmail account. If you use this problem then you also might have to live with the problem that you will have to keep your old Gmail account active simultaneously with the new one and also if you have joined some mailing lists and if your new account is not a part of that then you need to check your old Gmail account periodically.
- You can also auto forward all your mails from your old Gmail account to the new Gmail account which you can set through the settings and also after applying this setting, you need not check the old Gmail account as you will receive all the mails automatically.
2. Make use of POP feature for Downloading and Transferring Mails
With a great feature called POP in the Gmail settings, you now has the power to download all the mails from one account to the another account. For doing this, you just need to follow the below steps.

First, you need to open your Old Gmail account and need to follow the below mentioned steps:
- Open the Settings, which is located on the top right corner of the Gmail and then choose Forwarding and POP/IMAP option from the Gmail Settings.
- Now, out of the three options in this section, in the second option enable the POP first for all you mails which is there in the POP Download section and then save your settings.
- Go to the Accounts and Import option in Gmail Settings.
- Click on Add POP3 email account button from the Check mail using POP3 section.
- Fill up your old account information in the pop-up. Choose all defaults fields except POP server to pop.gmail.com and save your settings.
3. Migrate Completely to the new Gmail with your Labels
You can migrate all your mails completely to your new Gmail account but the problem in doing so is you will end up having a new unorganized mailbox. To, avoid this what you can do is to just remove all multi labeled messages and club into one for now, like use a single label and then using a desktop client you can drag and drop mails between folders of your choice.
Saturday, January 8, 2011
Reminders Made Easy with Nudge Mail
Nudge Mail - Reminders Made Easy
If you use your email as a to do list, nudge mail can help keep you organized. Once you sign up, you can forward your email to "monday@nudgemail.com" or "2hours@nudgemail.com" and your email will return as a reminder when you need it. You can even "snooze" a message if you aren't quite ready to deal with it yet.
Examples of emails:
sunday@nudgemail.com
monday@nudgemail.com
.....................................
.....................................
Just register in www.nudgemail.com

10 Top Tips for Using Email
10 Top Tips for Using Email
Email is a very powerful tool which can be equally frustrating. Sadly many people don't make the effort to ensure they are being helpful and responsible email users. 90% of the world's email problems would evaporate if everyone followed these ten tips.- Make sure the recipient is either expecting the email or won't mind receiving it.
- Make sure your email software is set up to display your return name and email address correctly. Use a meaningful name for yourself, e.g. "Brian Kirk" or "Superclean Domestic Services". Do not use non-specific names or names which won't mean anything to some people, e.g. "Grandma" or "The Gang".
- Always Include a subject line and make sure it tells the recipient what the email is about, e.g. "This months sales results" or "Plans for the weekend".
- Be very clear and specific in your email (without being too waffly). Tell the person who you are and why you are contacting them. Don't just send an attachment and hope they will figure it out for themselves.
- Only send attachments if they are necessary, e.g. don't use a MS Word document to send text which could have been typed into the email instead.
- If including attachments, make sure the recipient will have the appropriate software to open it (not all attachments will work on someone else's computer). Check the file size and make sure it's not too big. Click here for more info about attachments.
When sending photos or other images, optimise the file size first. Don't send photos from the default scanner or digital camera settings. Click here for more info about image files.
- Resist the temptation to use pretty stationery or unnecessary graphics. They annoy a lot of people and some email programs have trouble displaying them.
- Never reply to spam.
- Be very careful and restrained about forwarding jokes and other similar material. Most people receive too much of it already. Never forward chain emails.
- And finally, make sure you use reliable anti-virus software and update it every day. If you don't, then you are as much to blame for the spread of viruses as anyone. This point is not negotiable - if you are connected to the internet, you must be protected or you are a danger to everyone else.
Speed Up your Computer using Striped Volumes
Speed Up your Computer usingStriped Volumes |
If you are looking for a way to speed up your computers read and write speed and you like taking chances, then Striped Volumes are the way to go. A striped volume uses the free space on more than one physical hard disk to create a bigger volume. Unlike a spanned volume, a striped volume writes across all volumes in the stripe in small blocks, distributing the load across the disks in the volume. How does it work ? A striped volume will for the most part speed up your computer. This is because reads and writes happen across multiple disks simultaneously. Another name for this is RAID 0 (zero) which in truth isn't real RAID, but gives you some of the same functionality – SPEED. No Fault Tolerance However, the additional speed also means there is an increased risk of catastrophic failure leading to severe data loss. The simple explanation is that we place the available space in an array. If ONE of the disks fail, the array breaks, and the data residing on that disk, will be unavailable or lost. The Zero (Raid 0) therefore stand for Zero Backup and Zero Mirroring. Which is why regular backups are essential. However, the additional speed also means there is an increased risk of catastrophic failure leading to severe data loss. The simple explanation is that we place the available space in an array. If ONE of the disks fail, the array breaks, and the data residing on that disk, will be unavailable or lost. The Zero (Raid 0) therefore stand for Zero Backup and Zero Mirroring. Which is why regular backups are essential.Also, the portions of disk used to create the volume need to be the same size; the size of the smallest free space included in the array will decide how much available space you can use. For example, if a 120 GB disk is striped together with a 100 GB disk, the size of the array will be 200 GB (100 + 100). So if the above sounds good, then… Before you go ahead, make sure to back up any data on your hard disks.Converting a VolumeStriped Volumes require that you have Dynamic Volumes. You can choose to do so before you start or letting the Striped Volume Wizard do it for you. To convert a volume from a Basic Volume to a Dynamic one you have to delete the volume first.
 Setting up the Striped Volume
|
Friday, January 7, 2011
To get SMS alerts at Free of Cost
Hai friends this is satya. I maintain a Channel U_get_@ll_here_by_satya about Latest Technology Updates, Ebook for all Programming Languages, Latest Software and etc....
So please register ur mobile at GOOGLE groups and get this benfits.......
Registration process
STEP-1
Click on the below link
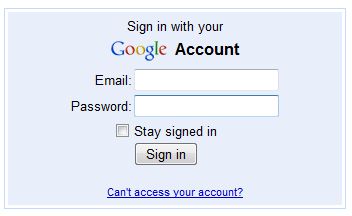
Now u will be Re-directed to a login page like shown below
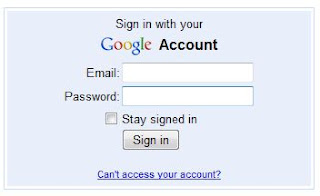
STEP-2
Now u will be promoted to the Conformation page as shown below
Click on U_get_all_here_by_satya which is highlighted with red mark( As shown in the below image)

STEP-3
Now click on the "Settings" Tab which is on the right most corner of the page as shown in the below image

STEP-4
Now u will get the settings as shown below
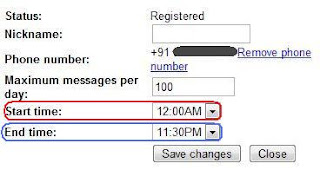
Change the below things which is mandatory to get the 24 Hours alerts
Start time : 12:00 AM
End time : 11:30 PM
Now at last click on the " Save changes " Button.That's it now u can get the alerts for 24 hours.
if your subscribed to any other sms channels then it would be better if u increase the " Maximum messages per day : 100 "
for more details Just visit www.satyaindia.co.cc
So please register ur mobile at GOOGLE groups and get this benfits.......
Registration process
STEP-1
Click on the below link
Now u will be Re-directed to a login page like shown below
STEP-2
Now u will be promoted to the Conformation page as shown below
Click on U_get_all_here_by_satya which is highlighted with red mark( As shown in the below image)

STEP-3
Now click on the "Settings" Tab which is on the right most corner of the page as shown in the below image

STEP-4
Now u will get the settings as shown below

Change the below things which is mandatory to get the 24 Hours alerts
Start time : 12:00 AM
End time : 11:30 PM
Now at last click on the " Save changes " Button.That's it now u can get the alerts for 24 hours.
if your subscribed to any other sms channels then it would be better if u increase the " Maximum messages per day : 100 "
for more details Just visit www.satyaindia.co.cc
Subscribe to:
Comments (Atom)